Sew Along No 3: The “Just Sew Happy" collection - The Sewing Machine Cover

Welcome back to the blog. So if you are joining me on this
series of Sew Alongs, this is the place to be.
This blog post is all about what you need to know for the
Sewing Machine Cover.
By now you will already know what is needed for the Sewing
Machine Cover. But, for those of you who missed it or would like a reminder,
here is the blog post of what you will need to be able to make it. http://rjafmakes.blogspot.com/2020/02/normal-0-false-false-false-en-gb-x-none.html
There is a Sew Along YouTube video for this Sew Along. Click
here to watch the video
The video will start from what I’ve cut out, to prepping
your fabric and making the complete finished cover.
I will explain everything I’ve used, as in tool wise within
the video too. But if you get stuck, please just ask any questions either by
visiting the Facebook group, here on the blog, on my YouTube channel or via my
social media Facebook and Instagram. I'm here to help you out and to make this
an amazing sewing experience.
This is where you need to measure your machine. So using the
formula will help you with the cutting out.
For the height measure
up from the table your machine sits on. So measure up from the bottom to the
top of the machine, then times that by 2 (this will be your front and back of
the machine measurement for now).

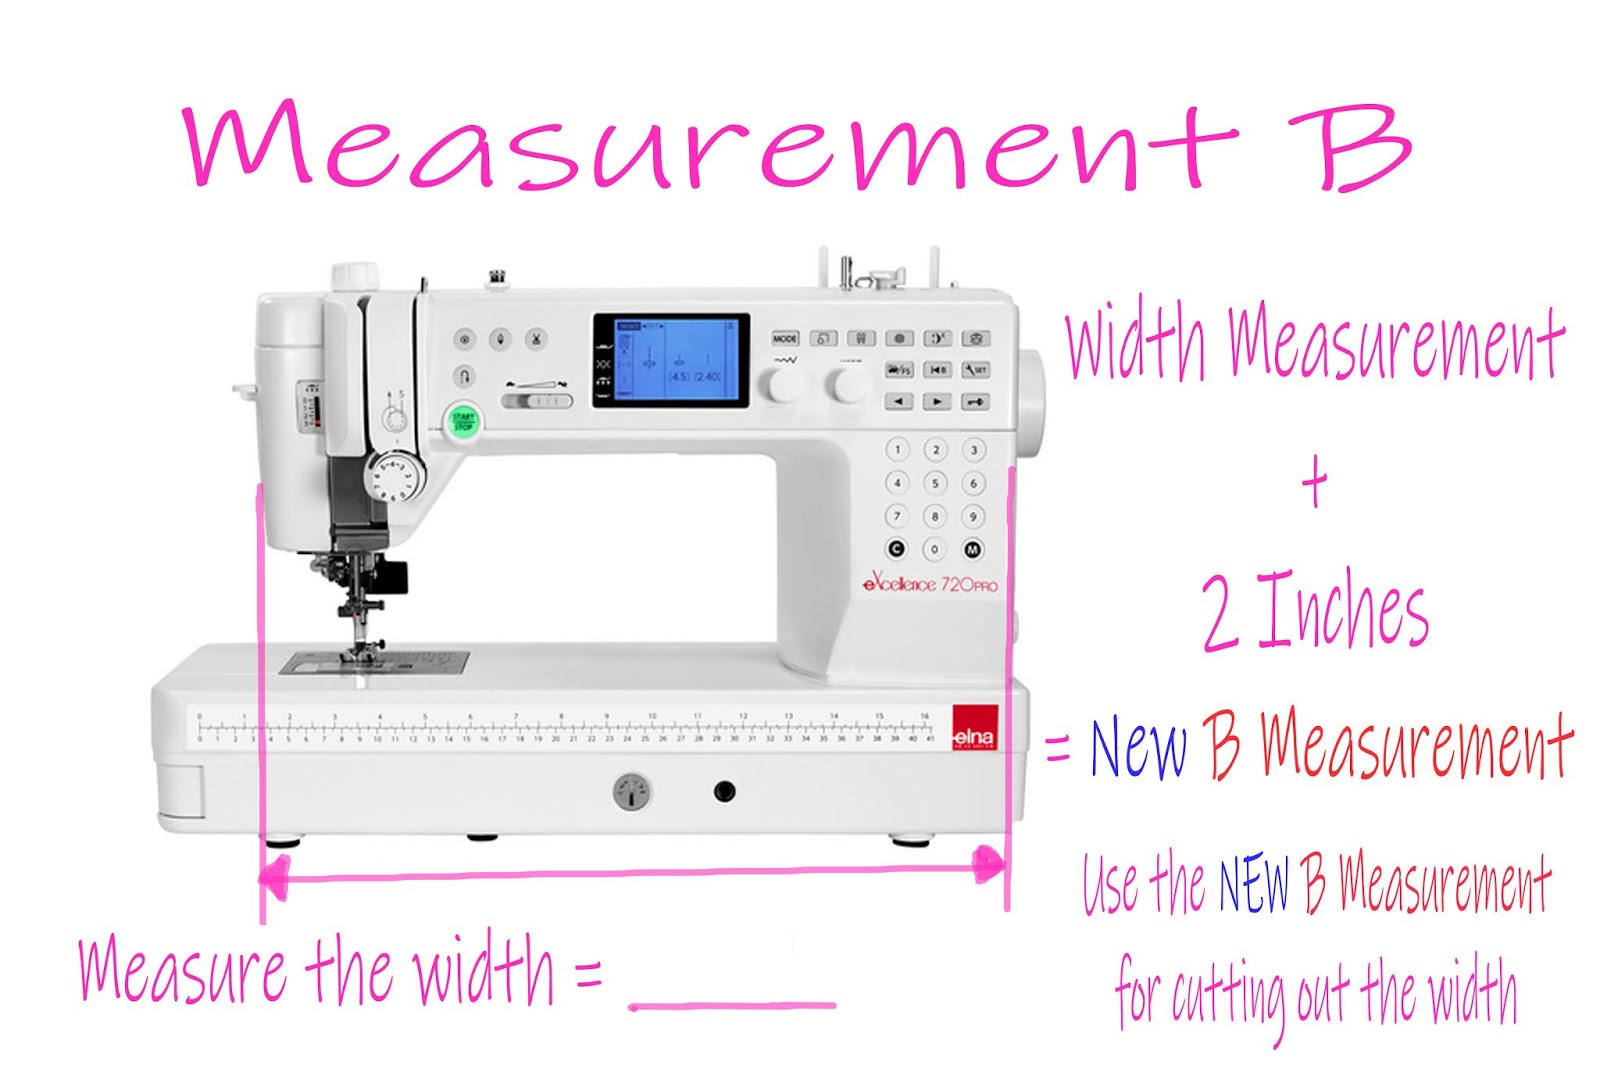
Now measure the width of the top of the machine,

so now you
will have 2 measurements. The complete height measurement for front and back,
and the width of the top of the machine. Add these 2 together. Let’s call this measurement A.

For the width use
the width measurement of the top of the machine. Now let’s call this measurement B.
The final overall
measurement so you will need to add some extra allowance (more inches) to
your measurements. So take measurement A
add (+) 2 inches = (this will be your
final height measurement for cutting out)
Now with measurement
B add (+) 2 inches = (this will be your final width measurement for cutting
out)
Make a note of your two measurements.
So here is everything you need to know for the cutting out
of the Sewing Machine Cover.
(So if you have bought the panel from the “Just SEW Happy”
range and your two measurements are less than the actual panel, you will need
to cut down your panel to your 2 measurements)
Outer Fabric cut
1 piece using measurement A x measurement B out of your panel or
stash fabric.
Lining Fabric cut
1 piece using measurement A x measurement B out of your Lining
Fabric.
Interfacing cut 2
pieces using measurement A x measurement
B out of the Medium Weight Interfacing.
Fusible fleece cut
1 piece using measurement A x measurement B out of Fusible Fleece.
Quilt Binding for
binding and ties cut 5 strips measuring 2 ¼ inches by 44 inches on the
straight grain (selvedge to selvedge), out of stash fabric.
You may need less binding than 5 strips, as these 5 strips
are for the overall panel.
Fuse all Interfacing pieces to the wrong side of the
corresponding pieces of fabric, following the manufacturer’s instructions.
Then fuse the Fusible Fleece to the Outer Fabric piece on
the wrong side.
Thanks ever so much for joining in the fun. Please do show
your makes within my Facebook group or tag me within your post on social media.
Happy sewing everyone.
X


No comments:
Post a Comment