OK!
Who admits you over fill your bag? I know I do! And most of the bags
I use are crossbody ones, which means they dig into my shoulder.
So
I’m doing this mini tutorial to help you out with how to make a
padded cushion for your strap.
What
you will need.
1x
Fat Quarter or ¼ metre (Main Fabric)
1x
Fat Quarter of the Medium Weight Interfacing iron on.
1x
4 inch by 10 inch of Sew In Foam
1x
piece of ½ inch wide x 26 inch long double fold Bias Binding tape
(or make your own by cutting a 26 inch by 2 inch strip on the bias,
making sure you cut your strips on the 45 degree angle.
Making
your own Paper Template.
I’m
making a 3 inch wide by 7 inch long pad (this is ideal for a 1 inch
to 1 ½ inch wide strap).
Now,
you can make yours as wide or as long as you want. You will need to
work out your own measurements to make a different size one.
Step
1
Take
an A4 piece of paper and fold it in half horizontally and crease the
fold. Then open and repeat the half fold vertically and crease. So
you have now quartered the piece of paper into 4.
Step
2
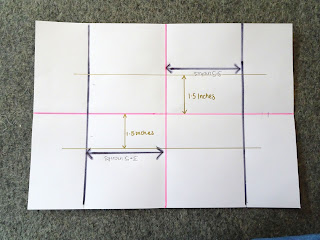
On
the creases, draw each line so you can visually see them. Then on
either side of the vertical centre crease, measure 3 ½ inches on the
right-hand side and draw a line, and then measure 3 ½ inches on the
left hand side and draw a line.
Step
3
From
the horizontal centre crease, measure up 1 ½ inches and draw a line,
then measure down 1 ½ inches and draw a line.
Step
4
From
the 3 ½ inches marks, measure 1 inch on the outer edges and draw
lines. By now you should have 8 drawn lines.
Step 5
Now,
starting at the 1 ½ inch horizontal line, draw a curved line from
one 3 ½ inch vertical line to the outer 1 inch vertical line, all
the way up to the centre crease (see photo). This will become the
master curve for all the other curves.
Step 6
Fold
your paper vertically on the centre crease, with your marks on the
outer side.
Step
7
Starting
on the curve, cut around the curve to the 1 ½ inch marked line.
Step 8
Now
cut along the 1 ½ inch marked line to the vertical centre crease.
Then cut down the centre crease to the bottom of your paper.
Step 9
Open
up the paper and now fold it on the horizontal line with the cut out
on top. Draw around the curved shape onto the other half of the paper
then open it out.
Step 10
Now
cut around the new curved lines.
Step 11
This
will be your cutting out template.
This template can also be used for an 1 inch wide strap too.
Cutting
out
So
your template is now effectively 2 templates.
The
first template is the over all piece which we will call the Main
Body.
The
second part of the template is the rectangular shape you will get by
folding in both 1-inch lines. This we will call the Tube.
Cut
out from your Main Fabric the following pieces:
The
Main Body - cut 2 pieces.
The
Tube - cut 2 pieces.
Cut
out of the Medium Weight Interfacing the following pieces:
The
Main Body - cut 2 pieces.
The
Tube - cut 2 pieces.
Preparing
your fabric
Fuse
the iron on Medium Weight Interfacing to the wrong side of all the
corresponding pieces.
Making
the Shoulder Pad
WS
= Wrong Side
RS
= Right Side
Step
1
Take
one of the Main Body pieces and pop it WS facing down on the Sew In
Foam. Pin it into place and baste stitch ¼ inch away from the edge,
all the way around.
Step
2
Trim
back the excess Sew In Foam to the Main Body piece.
Step
3
Flip
the now attached Main Body piece over so the foam side is facing up.
Pin/clip the other Main Body piece WS facing the foam.
Step
4
Baste
stitch ¼ inch away from the edge, so the foam is now sandwiched
between the 2 Main Body pieces.
Step 5
Take
both the Tube pieces and pop them RS together. Then pin the 2 short
edges together. Sew both together using a ¼ inch seam allowance.
Step
6
Turn
the Tube RS facing out and press well. Then top stitch 1/8 inch away
from the 2 short edges.
Step
7
Take
the Main Body piece and find the centre top and bottom of the 2 long
edges. Then find the centre top and bottom of the 2 long edges on the
Tube.
Step
8
Matching
up the centres on the Tube and Main Body piece, pop the tube onto the
Main Body and then pin the Tube into place down the 2 long edges.
Baste stitch the Tube within the seam allowance down those 2 edges.
Step
9
Open
out the Bias Binding and down one long edge, using clips attach the
raw edge of the binding to the edge of the pad. You will need to
leave a large amount of Bias Binding over hanging and use a clip to
hold it into place.
Step
10
At
your machine sew the Bias Binding on to the pad. You will be sewing
on the crease nearest the edge. Start sewing just after the halfway
mark on one long edge.
Step
11
Sew
all the way around but stop after you’ve sewn the last curve of the
main pad.
Step
12
Trim
the start of the Bias Binding back so you have an inch overhang.
Step
13
Now,
get the end of the Bias Binding strip (which is the side you finished
sewing at), and lay that on top of the start of the binding. Trim it
where its 1 inch over the start of the Bias Binding.
Step
14
Take
the now trimmed back end Bias Binding piece and fold the edge to the
WS by ½ inch and press.
Step
15
Place
the start of the Bias Binding piece on top of the fold of the end
binding piece, and clip the rest of the binding to the raw edge of
the shoulder pad.
Step
16
Carry
on sewing the rest of the Bias Binding onto the main pad.
Step
17
Peel
back the Bias Binding closest to the raw edge and now trim back the
Main Body by at least 1/8 inch but no more than ¼ inch. Do not touch
the Bias Binding.
Step
18
Now
bring the Bias Binding over to the back of the pad and clip the
binding into place.
You
can hand sew the binding or machine the binding, to finish off the
pad.
You are done!!


